Tuesday, March 22, 2011

Navisworks 2012 is coming!


I am sure a number of you have heard the buzz for weeks now. Navisworks 2012 is on its way and now I can talk about it! So, what features does this new version bring? How about switchback to Revit! Yes, you heard me correctly. The switchback feature that works oh so well for Autocad based files (and Microstation) now works with Revit 2012! Wahoo!

As you can see to the right, like Autocad, you will need to launch Revit 2012 and have an empty project open so ou can launch the switchback feature. In Autocad based products, as you are well aware, yo u need to launch Autocad (or Autocad MEP, Architecture, etc.) and then type NWLOAD at the command line to get it talking with Navisworks.

After loading the model, if you select an element in Navisworks and right click, you will see the switchback option on the menu as shown below.


Another huge improvement is also Revit related. You can now export linked files from Revit to Navisworks. Again, this is a setting inside of Revit, but linked files now read through which means you will not have to open up every link in Revit to get it to export to Navisworks. This will solve quite a number of long standing issues, especially in regards to project work points, dataset alignment and project hours spent opening and re-exporting files. You will also note that construction parts ( a new feature in Revit 2012) is also supported.


Other features you may want to investigate:
  • Timeliner Improvements (Gantt view is now editable and more integrated into the tool)
  • Clash Detection Improvements (you can now assign clashes, export to a tabular html format and have a wire frame option in the Clash Detection viewer when looking at clashes)
  • Improvements in 2D file support (including Archicad, Sketchup, Pro/Engineer).
  • Project Browser (more on this in another blog posting).
  • Appearance Profiler (last year a subscription tool, this year it is integrated in the software)
  • Additional Avatars other then T-Shirt Guy and Hard Hat Guy (last year through subscription, this year it is integrated into the software).
  • Vault support
  • Timeline Options (formally known as Global Options)
You can download a free 30 day trial for Navisworks and Revit 2012 here when they becomes available:

http://usa.autodesk.com/navisworks/trial/
http://usa.autodesk.com/revit-architecture/trial/

Note: You will need Revit 2012 to test the switchback feature.

Happy trails...er...Trials!


Tuesday, February 15, 2011

BIMSIGHT Review


BIMsight beta 1.1
has just been released by the Tekla Corporation. This is a free tool for the construction industry providing building coordination, communication and management across a few standard data types:
  • (IFC (.ifc)
  • IFC XML (.ifcxml)
  • IFC ZIP (.ifczip)
  • DWG (.dwg)
  • DGN (.dgn)
  • XML (.xml from Tekla Viewer)
First Take: Initially, it appears as a free replacement for Naviswork's Clash Detective, but before you jump in, a little review is in order. I tested the tool against the same dataset in Navisworks (two 3D DWG files). Both Naviswork's Clash Detection and BIMsight found the same number of clashes when the tolerances were identically set. Each software could zoom to the particular clash (though Navisworks will do this with more ease then BIMsight) and allow the user to redline, make comments or change the clash status. So far, so good you say?

Unfortunately, the similarities stopped there, as BIMsight does not provide tools for reporting or seamless tracking of changes over time. For some, this may be a non issue, as they are using Navisworks as a per incident on the fly tool, rather then a project life cycle tool. For others, this is a deal breaker.

So here is my short list of a very limited side by side, kick the tires review:

What I liked:
  • Its free!
  • The install was quick
  • Moderately easy to use
  • Minimal interface
  • Ability to load more then one file at a time
  • Easy to create clash types
  • Easy to assign clashes to various trades
  • Different view shade modes (Transparent, X-Ray, Solid)
  • Ease of adding notes
What I did not like
  • Slow loading multiple files
  • Slow click responsiveness
  • Graphics in Conflict mode hard to differentiate
  • Cannot assign color per trade
  • Cannot move individual elements only entire data sets
  • Cannot organize views
  • Small list of file types that it supports
  • Clash Report/Update History
  • Measure tool weirdness
  • Instability (crashed frequently on Windows 7 64 bit)
  • Lack of walk/fly tool
  • Difficult to move entire data sets unless you know exactly how far you need to move it in the xy & Z


Evaluation: As a replacement for firms using Navisworks Manage Clash Detective on small data sets that are *dwg or *dgn based it can be a useful tool in one's arsenal. For instance, a firm with Navisworks licenses, could deploy this tool for project managers whom want to just review very specific data sets. This would free up a Navisworks license for other staff dealing with larger and more diverse data sets and needing the extra reporting and Timeliner scheduling features. In this regard, BIMsights place in your toolbox falls somewhere between the Navisworks Freedom Viewer and the old flavor of Navisworks (Navisworks Review).

The lack of BIMsight's support for other file types (this is in part planned) other then IFC, DGN or DWG is a huge issue, especially with firms using Revit, Solidworks, or SketchUp. Moreover, point cloud support is lacking as is the ability to publish to Google Earth.

Conclusion: I realize that this is a beta release, and more features, etc. will probably be available in the final release. All in all, I think it is a useful tool in one's toolbox, but it no more a replacement for Navisworks Clash Detective then my hammer is for my framing nailer. Each has a specific use and function and should be viewed as such.

In regards to BIMsight (via Tekla Corporation) pushing the IFC issue (open source format for BIM) back into the limelight, only time will tell. IFC seems to come and go and occasionally shows promise, but there is a huge gap between the dream and day to day reality (i.e. production and getting projects out the door).

To find out more about BIMsight you can click here:

http://www.teklabimsight.com/

You can also read Revit Uberman Steve Stafford's review here:

http://revitoped.blogspot.com/2011/02/tekla-bimsight-free-divided-by-free-is.html

Monday, January 31, 2011

Search and Selection Sets - Part I

Search and Selection Sets are the most important feature inside of Navisworks, bar none. This is the only place in the entire program where you have full control of naming conventions, organization and selection. In light of this, it still amazes me how many people are using the software and not using this feature.

This will be the first post in a series that demonstrates how we can utilize this feature to quickly find all the ducts and steel in a model and use what we find for coordination purposes.

Let us dive right in and explore this feature. First, you need to turn the feature on in the interface. In Navisworks 2010, you can go to View>Control Bars>Selection Sets (shown below)or you may use Shift + F2 to turn the window on in the view. In Navisworks 2011 you can turn the window on by going to View>Window and checking the Selection Sets option from the list or you can use the short cut listed above.


Once you have the window open and docked ( I usually have it on the upper right side of my screen) you can utilize the feature as necessary. As you can see in the image below, I have created two Selection Sets and two Search Sets. Searches are shown as a small blue square with a pair of binoculars, sets are shown as a large blue square circumscribed by a circle.


How do you create Search and Selection Sets you ask? They are created in different ways within the program. Let's look at Selection Sets first. A Selection Set can be created by one of the following methods:
  1. Select some items in the view window by either picking on them and holding shown your Shift key to add items to the selection or you can use Select Box (in Revit this would be Select Region and in Autocad this would be known as a Window Selection or Crossing/Fence Selection). After selecting your items, simply put your mouse in the Selection Sets window, right click and choose Add Current Selection from the right click menu options.
  2. Select items from the Selection Tree and then place your mouse in Selection Sets window and choose Add Current Selection from the right click menu options (see image below, left).
Notice in the image on the left, that you can also add folders to the Selection Set window. We will discuss this in a later post, but be aware that organizing your data within Navisworks is 50% of your success in using the software. The other 50% is Selection and Search Sets as well as Viewpoints.


To update a Selection Set you will need to select additional items by one of the two methods mentioned above, and then right click on the Selection Set in the Selection Set window and choose update from the menu options as shown in the image below.


This is an important distinction between Search Sets and Selection Sets. Selection Sets are a snap shot of a point in time (when you created them). The do not update on their own. If you add more data to the Navisworks project, such as more steel or ducts, the Selection Set will not update to reflect these changes. You will need to manually update the set.

Search Sets on the other hand, do automatically update because they are not based upon a manual selection, but rather search the dataset for a specific property such as a word in a layer name (i.e. steel, duct, conduit, valve, etc.) or a material name (ASTM - A572 - Grade 50), or even a specific cost!

To create Search Sets, you need to utilize the Find Items tool to first search for the specific property and then save the search in the Selection Sets window. I have provided an example in the image shown below. As you can see I searched all the data sets in the file for a property that has a material assigned to it that contains the word "steel". The Find Items tool (Shift + F3) quickly found 9601 items. Imagine how long it would take you to select all the steel in the dataset manually! You can see that this feature alone will increase your ROI within a week's time!


The great thing about this search is that because it is based upon a property, the next time I open this project with an updated structural model, it will update to reflect all the steel in the model. I will not have to update it manually. Looking forward, you will see how this will impact your clash events in Clash Detective.


In my next post, I will provide some tips and tricks on how to create search sets that can be utilized project to project as well as some tricks about folder structure within the project.

Regards,
Teresa

Wednesday, December 15, 2010

Don't be a one trick Pony

As we wind down the year and start thinking about the next 6-12 months, it is important that we leverage our current skills with new and up and coming technology. I heard over the wire recently the some architects think that Navisworks is of no use to their current work flow. One architect in particular commented "I would never use or teach Navisworks to my team". In general, these are the same people whom said CAD was a fad and that BIM would never fly.

I have found that there are two types of people whom do not embrace new tools: those with a singular lack of vision and those whom suffer from an unwillingness to step out of their comfort zone. In other words, these people do not want to try something different for fear of failure or just looking silly. These are the people who believe that focusing on just one thing will get them through the day. They want to be "experts" at just one thing. And in general they will “flaunt” their expertness, until they realize that they have become irrelevant.

Well, I hate to be the bearer of bad news, but strictly speaking, architecture is a generalist type of profession. As is construction. You cannot be good at just one thing and keep yourself relevant in today's global market place. It is not that type of world.

Take bees for intance. There are specialist bees and generalist bees. Specialist bees have developed a relationship with just a few or one type of flower. Generalist bees have developed a wide variety of tastes when it comes to flowers. Guess which ones are more abundant and fair better in urban environments?

Architecture is much the same way. Firms that survive the lean times have more then one trick up their collective sleeves. These are firms with good business plans that focus on a range of project types and offer an assortment of services. These are the firms that will still be in business when the economy returns to normal.

So here is a is a great video about some of the uses of Navisworks for Architects:

http://www.aec-area.co.uk/NW/Videos/NW2011_ForArchitects_controller.swf


As for my personal perspective, I know that if I had had Navisworks when I was working on large resort and multifamily projects, I would have not lost out on years of sleep as well managed to make it home at a decent hour.

My top five uses/reasons for Architect's to introduce Navisworks into their workflow include:
  1. Better coordination: Even within your own Revit model! Navisworks has a much, much better clash and interferance checker then Revit's interferance checker. For instance, you can choose a variety to different types of objects such as columns and railings and compare them to doors and stairs. Revit only lets you compare catagories of objects such as walls to columns. It does not let you drill down and just check all of your steel to all of your ducts, stairs and openings. Naviswork's ability to let you filter out unnecesary items and select just the relevant data is a huge work flow advantage.
  2. Quick and seemless navigation. Because of Naviswork's distinct compression algorithem, huge datasets are compressed down to a managable format. In short, any user can easily navigate in real time without having some super tricked out computer. And the navigation is easy! You can walk, you can crouch...You can fly!
  3. Aggregation of diverse datasets. I call Navisworks "Kitchen Sink" software. In other words, it can read any file type you are likely to run into in the AEC profession, including the kitchen sink. This is particularly useful for architects whom are dealing with trades that are working in Microstation, Archicad, Civil3D and CADMech/Duct. Because Navisworks allows you to coordinate across multiple file types, architects can always be on the same page with their subs.
  4. Validation: Because you can aggregate diverse datasets, you can validate your design early and effectively. You can create virtual walkthroughs and punch lists for big room meetings and discussions. Navisworks also lets you share the animations and model easily by way of the Navisworks Freedom viewer.
  5. A seat at the table: Time and again, I hear from my architectural collegues that they are being marginalized during coordination meetings. In order to have a seat at the table and join in the conversation, you have to understand and be able to use the current technology. Navisworks lets you put skin in the game, instead of sitting on the sidelines.


See you all in the new year!


And, as for my new years resolution, I am going to post at least once a month! My first post of the new year will be regarding search and selection sets.


Until then, adieu.

Friday, June 25, 2010

Turning off those light sources!

An outstanding issue with datasets exported from Revit in the *NWC format is the light source object. Even when you turn it off in Revit before exporting, it stills shows up in Navisworks. This will cause problems if you are running Clash Detective with tight tolerances and keep getting 'hits' or false positives because of the light source object. So how do you turn it off without having to scroll through the selection tree?

Use a Search Set! Search Sets and Selection Sets are by far the most valuable tool in Navisworks. Anyone who has taken one of my classes knows that I tend to harp on this subject ad nauseum.

The question is, how do we set up the search set? The answer is through a material filter called Default Light Source.

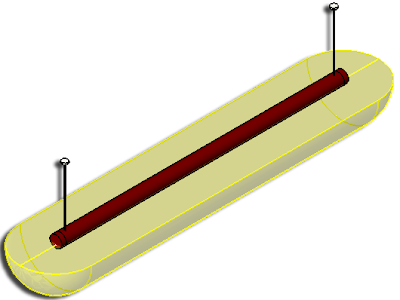
Example: In the image below, you see how the light appears in a Revit project before export. Remember, even if I turn this off before exporting using Visiblity Graphics (VG), it will still show up in the Navisworks NWC file upon appending the project file.

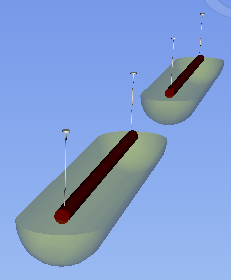
When I open the NWC file in Navisworks, the light fixtures will look like this:


How can we quickly turn off all of the lights sources without having to drill down in the Selection Tree and pick each one individually? (A very low value, mind numbing task!).

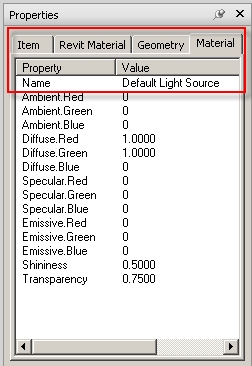
If you drill down the selection tree until you get to the nested light source object you will see a nested object called "Solid". If you look at the objects properities in the properties window, you will see that it shows up on the Material Tab and has a Property Name value of Default Light Source.


Using the Find Items Tool we can set the search field as follows and then save this as a Search Set. This will enable us to quickly turn off the light sources or set up rules in Detective to ignore items in a specific Selection Set.

Happy Hunting...!


Locking your Global Options

This is one of those smart little tricks that is buried in the help menu in Navisworks. You can lock your global options on local machines to prevent accidental changes to settings such as units, viewpoint defaults and file reader settings.

Here is the trick:
Go to Start and then Run.
Enter CMD.exe to launch the DOS Window

The directory will look something like this:


You will need to change the directory by typing CD C:\Program Files\Autodesk\Navisworks Manage 2011 as shown above.

(Note, mine is installed on my D: drive partition, but in most cases this will probably be the user's C: drive)

Hit 'Enter' and then type "optionseditor.exe" -l (That is a space after the quotes and a minus sign in front of the letter "L"). It will take a second of two for the Options Editor to launch. You will then see the following:


Notice the locks! You can lock any settings that you do not want your users to change, thus causing errouneous results in Clash Detective as well as mis-scaled datasets.


The next step is to export these options by selecting the export option on the lower left. Check all the options in the dialog box as shown to the left. You will need to set a project directory location that has a global_options folder in it with the exported options file (*XML) placed in that folder.


Now when you relaunch Navisworks, the options will be locked! This will make the life of VDC and BIM Managers a lot easier!


As a final note, you can find this information , sans screen captures in the help menu by going to this topic: How do I share the Autodesk Navisworks settings on a site and project basis

Thursday, June 24, 2010

A little slow on the get go

Sorry there have been no new postings lately. Business has been, well crazy!
I will be posting soon with some tips and tricks for Navisworks 2011!