Wednesday, February 22, 2012

Is it really February already?

So...I have been swamped the last few months...End of the year, AU and a house remodel!  Did I mention I am doing my own wiring, insulation (UltraTouch is nice!) as well as fun with drywall, mud and tape.  I am hoping to be posting more this year on a more regular basis.  All of you know that March is fast approaching and March/April means new releases of Revit and Navisworks!

For those of you looking to get into more presentations this year for marketing purposes and new work you might want to check out Autodesk Showcase.  This is a really awesome product that anyone can learn and use with Navisworks models for quick real time presentations, proof of concept studies and presentations.

You can check it out here:

http://usa.autodesk.com/adsk/servlet/pc/index?id=6848305&siteID=123112


Oh, and by the way, you get it into Showcase from Navisworks via FBX export!
See you all soon.  I have some posts coming up on IConstruct as well as some other tips and tricks for Navisworks!
See you soon!

Teresa

Thursday, November 17, 2011

IConstruct - Round Tripping your data through Excel!


As I mentioned previously, this month I am going to discuss a plugin to Navisworks Manage called IConstruct. This is an add-on tool that will allow users to add additional data to the Navisworks model without having to go back to the native datasets (i.e. Autocad, Revit, Microstation, Inventor, AutoPlant, etc.). Currently, driving data from Navisworks to external databases is problematic at best. For instance under data tools, the user must really be proficient in SQL programming to get this to work in any usable way.


And please, do not even get me started with the whole 64bit ODBC Driver issue! Frankly, I think having to upgrade to MS Office 2010 just to get the functionality is really depressing. You can thank Microsoft for this! Additionally, the Appearance Profiler that I mentioned in a previous post lacks some basic functionality and ease of use issues.

Below you can see an image of the IConstruct Integrator Configuration dialogue box. This is the fundamental step in the entire process. As you know, in Naviswork, you cannot edit any of the property tabs that come in with external datasets. The only data the property window reports are data that came in with the dataset (Revit Parameters, Autocad attributes, etc.). The Integrator lets you do two things:
  • Create a custom data tab
  • Migrate data from any other tab available
  • Edit the data on the tab


IConstruct Integrator Configuration
Once I have created my custom tab and migrated the properties, you can see in the image below that when I select a wall in the model, my tab appears in the properties window.


Now that I have this custom tab, I can do a number of things, including change the values.  For instance, the wall is an Exterior Precast Panel.  If I wanted to change this wall or all the exterior walls to Exterior CMU, I can do so here on this tab.  Now if your thinking I would now have to do this individually, you would be incorrect!  IConstruct provides me with a Find and Replace tool for Data.  With the Find and Replace tool,  I can search the Navisworks database for that specific piece of data and replace it with one of my own, leveraging search sets in the process.  How awesome is that?!


IConstruct Find and Replace Configuration


Customized Properties - Navisworks


Finally, because I have a customized tab, I can:

  • Link any/all the fields to Excel
  • Modify the data in Excel
  • Add additional data fields and data in Excel
  • Update the properties in Navisworks.

Excel Data Fields


As you can see in the image above, I have added some fields in Excel.  When I refresh the data in Navisworks using the Datalink tool, my properties are updated and populated in Navisworks!


As an added bonus, if the data has changed in Excel, when you refresh again, it will ask if you want to update the information (overwrite) in Navisworks.  You can actually control whether or not it prompts you to overwrite the data or just does it automatically.


I see this tool solving a number of critical business and workflow issues for design build , construction and contracting firms as well as facilities management clients:
  1.  Ability to drive data from the Excel/Navisworks side rather then having to wait for third party consultants to update base files in Navisworks (Revit, Microstation, Inventor, CAD Mech, etc.).
  2. Ability to tie Navisworks search sets, which allows for wholesale updates to groups of data in the model for inspection purposes, costing and/or site staging activities
  3. Allows end use clients (Facilities Managers, Building Owners) to link Navisworks to maintenance schedules and work tickets.
  4. Leverages the model geometry for multiple downstream uses while allowing customization of the data.
  5. Properties will be saved and can be viewed in Freedom viewer to the reduce the need to field supervisors to have a full version of Navisworks.

You can find out more about IConstruct here:

http://www.iconstruct.com/

For those attending Autodesk University, see you there.  I am teaching a class on leveraging the tools in Autodesk's Building Design Suite at any stage of the building process. AB4384-P.

Sunday, July 31, 2011

IConstruct


This month I will be talking about a new tool that works with Navisworks called "IConstruct".

http://www.iconstruct.com/

Essentially this tool allows you to roundtrip, aka "drive" your date from Excel or Access or any other database software. It also allows you to quickly add groups and custom property sets to the Navisworks model. For those whom have tried this using just the OOTB tools, you know how painful this can be.

I will be discussing some of the various features over the next few weeks.

Alas, it is late and I just got back from a K.D. Lang concert, so I am a little tired.
I will write more in the next few days.
See you soon!

Thursday, June 30, 2011

Appearance Profiler


The Appearance Profiler first appeared last year as a subscription tool, available for download from Autodesk Subscription Services. This year, it is incorporated into the main Navisworks 2012 interface.

The Appearance Profiler allows users to quickly assign trade and dataset colors to incoming datasets via search or selection sets. If you have ever attended any of my classes or you have read my previous blog posts, you will know that I hold Search and Selection Sets in high regard. To access the Appearance Profiler use Tools Panel on the Home Tab or the View Tab on the Workspace Panel>Windows Button.


To use the Appearance Profiler you will need to have either Selection Sets created or know which Search Sets you would like to use for the purposes of assigning colors.

As you can see below, I have assigned colors based upon the Search Set CADWorx and property = to _150_MM.


This will find all the data in the model that contains the CADWorx Category that has a Specification of _150_MM. Next, I have chosen a color and use the Add button to add it to the selector on the right of the image. I set up two other colors based upon Selection Sets: 03 - Steel Supports and 04 - Stairs.

You can see the original image below.

After I run the Appearance Profiler, you can see that the color of the pipes, stair and supports have changed.

Once run, the Appearance Profiler state can be saved as a viewpoint and the color changes will be preserved.

The question is, how does this tool help with your day to day workflow? Well, one of the tasks that is time consuming for VDC'ers (Virtual Construction Coordinators) is the importing of data and setting up Selection Sets by trade and then using the Override Transform>Color tool to change the colors of the datasets. If you are using Search Sets that are ubiquitous across many projects (i.e. Revit Walls, Floors, Columns, Ducts, etc.) you can re-use your color schemes simply be exporting them to an Color.DAT file and then loading this same *DAT file into the new project. All you need to do is hit 'Run' and the colors are done! Quick, easy, and scalable! We like it!

As an aside, you can Reset All Appearances on the Home Tab. The Reset Appearances is also available from the Right Click menu.

Give the Appearance

Profiler a try and see if it saves you

some time in your workflow process.

See you all next month!

Tuesday, May 31, 2011

Collapse on Convert - All Objects!

I know last month I mentioned I would be talking about the appearance profiler this month. However, I have been running a little behind schedule as of late, so I am going to do a quick entry on a super secret setting that may change your world if you are dealing in the currency of MEP clashes!

Most of you know, that you can use rules to filter out unwanted clashes inside of Navisworks. However, the rules are limited in use and frequently you still have a number of "false positives" when running your clashes.

For instance, the image below is from a standard out of the box light family in Revit (Troffer Light 2x4 Parabolic). This family is composed of a multitude of pieces and parts (11). If I run a clash in Navisworks using lights and say steel columns, I will get 4-9 hits per light, because the column is hitting the lens, the grill and the light source object.

Below, I ran a clash against columns and lights after exporting the file from Revit using the "Collapse on Convert" Composite Objects option located under Model>Performance. These settings are accessed from within Revit (not Navisworks!) under the Navisworks Settings when exporting from Revit to Navisworks.

Notice that I get 8 clashes. I purposely set up the Revit file with two columns interfering with two lights. What I want is just two clashes in Navisworks (one for each instance). However, as shown below I get 8 clashes. This occurs even if I set some of the out of the box rules in Navisworks. If you multiply this by how many lights, appliances, and equipment you may have in a file, clearly the number of clashes is expanding geometrically.


Now for the second example, I set my Revit export settings to Collapse on Convert All Objects. I also checked off the following same rules as shown above. Now, as you can see below, right I have only two clashes!


So, the moral of this tale is to use Collapse on Convert-All Objects when exporting from Revit to reduce the number false positives in your clashes! You might want to test this setting with various Revit data sets and check your results. As with anything, you might need to have different export settings and rules for different types of data sets!

Happy Clashing!

PS. In June, I will do a lengthy segment on the Appearance Profiler! I promise!

Thursday, April 14, 2011

Search and Selection Sets Part II


Alas! It has been a month or two since Part I. Here is part II, of the long awaited sequel!

As I mentioned in Search and Selection Sets Part I (Post Dated 1-31-2011), Search Sets are the gold in Navisworks. This is where you get to drive. This is where you have all the control. Search Sets, as mentioned are based upon common data properties such as size, name, type, file, units, etc. This is why they are so powerful! If you know the common property to search for, you work here is done! And most importantly, you can re-use searches in different projects if they search for similar properties.

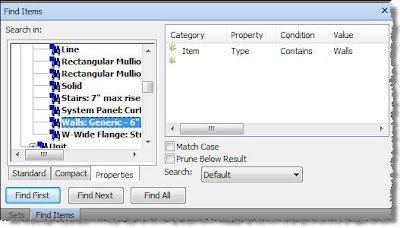
As an example, imagine a file imported from Revit (via *NWC Export). Revit, being the wonderful property based BIM format that it is, contains loads of property data (both instance and type). Now, envision some of the common properties in every Revit file, such as walls, ducts, beams or windows. You can set up a search in Navisworks to find all the walls or windows in the file (see image below).


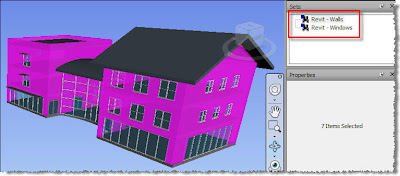
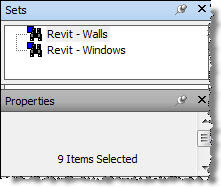
In the data set shown above, I created a Search Set based upon the Revit Type Property: Wall. When I change this data set in Revit by adding a few additional interior walls, you can see that the Search Set automatically updates. Notice how there are now 9 walls, as opposed to 7 in the previous search.

Thinking outside the box, once you have these searches saved, they can be exported and imported into any other project. To export the Search Sets from a project, simply go to the application menu and choose Export>Search Sets The file will export your searches as an *XML file. You can then import the searches into another project using the import option from the application menu.


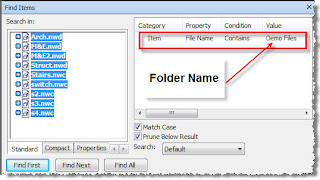
From a project perspective, Search Sets can be taken a step farther if you consider file and folder conventions as well. For instance, I can load data from a folder on my desktop named "Demo Files".

As I add additional data sets to this folder and append the *NWF file, the Search Set updates. For those of you seeing the big picture here, your job of updating the project from week to week just became a whole lot simpler if you took the time at the beginning of the project to create a tidy file and folder structure. If your current filing system looks anything like the storage system in my basement, you might need to do a little spring cleaning here to smite your errant file/folder conventions to alleviate the issue.

The image below shows how I set up my search to find a particular folder on my desktop. Of course for your office, you will want to path this to a server location and not your desktop for company wide use.


As a final thought, for those using Revit, you could put some custom shared parameters in the file to easily track in Navisworks, such as a FM parameter for items that need to be tracked for Facilities Management, etc.

Next month, I will be discussing the Appearance Profiler. Stay tuned!

Tuesday, March 22, 2011

Navisworks 2012 is coming!


I am sure a number of you have heard the buzz for weeks now. Navisworks 2012 is on its way and now I can talk about it! So, what features does this new version bring? How about switchback to Revit! Yes, you heard me correctly. The switchback feature that works oh so well for Autocad based files (and Microstation) now works with Revit 2012! Wahoo!

As you can see to the right, like Autocad, you will need to launch Revit 2012 and have an empty project open so ou can launch the switchback feature. In Autocad based products, as you are well aware, yo u need to launch Autocad (or Autocad MEP, Architecture, etc.) and then type NWLOAD at the command line to get it talking with Navisworks.

After loading the model, if you select an element in Navisworks and right click, you will see the switchback option on the menu as shown below.


Another huge improvement is also Revit related. You can now export linked files from Revit to Navisworks. Again, this is a setting inside of Revit, but linked files now read through which means you will not have to open up every link in Revit to get it to export to Navisworks. This will solve quite a number of long standing issues, especially in regards to project work points, dataset alignment and project hours spent opening and re-exporting files. You will also note that construction parts ( a new feature in Revit 2012) is also supported.


Other features you may want to investigate:
  • Timeliner Improvements (Gantt view is now editable and more integrated into the tool)
  • Clash Detection Improvements (you can now assign clashes, export to a tabular html format and have a wire frame option in the Clash Detection viewer when looking at clashes)
  • Improvements in 2D file support (including Archicad, Sketchup, Pro/Engineer).
  • Project Browser (more on this in another blog posting).
  • Appearance Profiler (last year a subscription tool, this year it is integrated in the software)
  • Additional Avatars other then T-Shirt Guy and Hard Hat Guy (last year through subscription, this year it is integrated into the software).
  • Vault support
  • Timeline Options (formally known as Global Options)
You can download a free 30 day trial for Navisworks and Revit 2012 here when they becomes available:

http://usa.autodesk.com/navisworks/trial/
http://usa.autodesk.com/revit-architecture/trial/

Note: You will need Revit 2012 to test the switchback feature.

Happy trails...er...Trials!