Friday, June 25, 2010

Turning off those light sources!

An outstanding issue with datasets exported from Revit in the *NWC format is the light source object. Even when you turn it off in Revit before exporting, it stills shows up in Navisworks. This will cause problems if you are running Clash Detective with tight tolerances and keep getting 'hits' or false positives because of the light source object. So how do you turn it off without having to scroll through the selection tree?

Use a Search Set! Search Sets and Selection Sets are by far the most valuable tool in Navisworks. Anyone who has taken one of my classes knows that I tend to harp on this subject ad nauseum.

The question is, how do we set up the search set? The answer is through a material filter called Default Light Source.

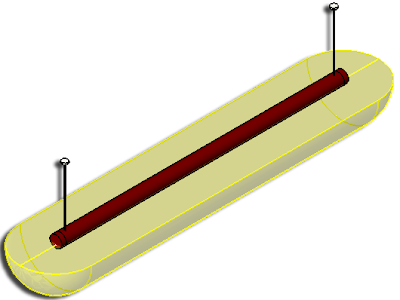
Example: In the image below, you see how the light appears in a Revit project before export. Remember, even if I turn this off before exporting using Visiblity Graphics (VG), it will still show up in the Navisworks NWC file upon appending the project file.
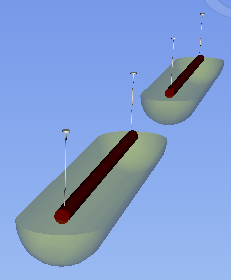
When I open the NWC file in Navisworks, the light fixtures will look like this:


How can we quickly turn off all of the lights sources without having to drill down in the Selection Tree and pick each one individually? (A very low value, mind numbing task!).

If you drill down the selection tree until you get to the nested light source object you will see a nested object called "Solid". If you look at the objects properities in the properties window, you will see that it shows up on the Material Tab and has a Property Name value of Default Light Source.

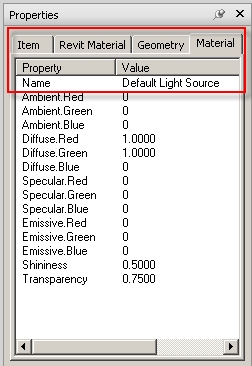


Using the Find Items Tool we can set the search field as follows and then save this as a Search Set. This will enable us to quickly turn off the light sources or set up rules in Detective to ignore items in a specific Selection Set.

Happy Hunting...!


Locking your Global Options

This is one of those smart little tricks that is buried in the help menu in Navisworks. You can lock your global options on local machines to prevent accidental changes to settings such as units, viewpoint defaults and file reader settings.

Here is the trick:
Go to Start and then Run.
Enter CMD.exe to launch the DOS Window

The directory will look something like this:


You will need to change the directory by typing CD C:\Program Files\Autodesk\Navisworks Manage 2011 as shown above.

(Note, mine is installed on my D: drive partition, but in most cases this will probably be the user's C: drive)

Hit 'Enter' and then type "optionseditor.exe" -l (That is a space after the quotes and a minus sign in front of the letter "L"). It will take a second of two for the Options Editor to launch. You will then see the following:


Notice the locks! You can lock any settings that you do not want your users to change, thus causing errouneous results in Clash Detective as well as mis-scaled datasets.


The next step is to export these options by selecting the export option on the lower left. Check all the options in the dialog box as shown to the left. You will need to set a project directory location that has a global_options folder in it with the exported options file (*XML) placed in that folder.


Now when you relaunch Navisworks, the options will be locked! This will make the life of VDC and BIM Managers a lot easier!


As a final note, you can find this information , sans screen captures in the help menu by going to this topic: How do I share the Autodesk Navisworks settings on a site and project basis

Thursday, June 24, 2010

A little slow on the get go

Sorry there have been no new postings lately. Business has been, well crazy!
I will be posting soon with some tips and tricks for Navisworks 2011!